How to Add PS2 BIOS in EmuDeck | Easy Steam Deck PS2 BIOS Setup

If you’re starting your journey into PlayStation 2 emulation on your Steam Deck using EmuDeck , one of the very first things you’ll need to do is add the PS2 BIOS .
Without it, your PS2 emulator (like PCSX2 , which comes with EmuDeck ) won’t be able to run games. Think of the BIOS as the PlayStation 2’s operating system — it’s what tells the console how to boot up and play games, just like the original hardware.
In this guide, we’ll go through everything you need to know — how to find the right folder in EmuDeck , where to put your BIOS files , and some extra tips to make sure your PS2 games internal run smoothly. Even if you’ve never used EmuDeck before, you’ll be able to follow this and have PlayStation 2 classics running in no time.
What is EmuDeck, and Why Does the PS2 BIOS Matter?
First things first — what is EmuDeck?
It’s an all-in-one tool that sets up multiple emulators on your Steam Deck in one go. Instead of downloading and configuring each emulator manually, EmuDeck does the hard work for you — installing, organizing, and even adding custom settings and artwork for your games.
For PS2 games, EmuDeck uses an emulator called PCSX2. But here’s the important part: PCSX2 needs the PS2 BIOS to work. Without it, the emulator simply won’t know how to start a game.
You can think of it like this:
So before you jump into God of War, Crash Twinsanity, or Shadow of the Colossus, you’ll need to make sure your PS2 BIOS is correctly installed.
Finding the BIOS Folder in EmuDeck
This is the part most people get stuck on when learning how to add a PS2 BIOS in EmuDeck knowing exactly where the file goes.
Here’s where to put it:
Default location on Steam Deck: ~/.config/PCSX2/bios
To get there, you can:
When Should You Place BIOS Files in the BIOS Folder?
You’ll need to put your PS2 BIOS files directly into the /bios folder in EmuDeck at certain times to make sure PCSX2 works properly. Think of the /bios folder as the “home” where your PlayStation 2 system files live. Without those files in the right place, your games won’t boot—no matter how many you have ready.
Here are the main situations when you should place your BIOS files there:
Important Tips Before Adding BIOS Files
💡 Pro tip: After placing the BIOS files, restart PCSX2 and check the BIOS selection menu to confirm they’re detected.
What is ES-DE, and How Does It Connect to EmuDeck?
When you’re setting up EmuDeck, you might notice another name pop up: ES-DE, which stands for Emulation Station – Deck Edition. At first, it can be confusing — is this another emulator? Do you need to install it separately? Let’s break it down in simple words.
Think of ES-DE as the “front door” to your retro gaming collection. While EmuDeck handles all the behind-the-scenes magic—like installing emulators, configuring settings, and organizing your folders—ES-DE is what you see and use to actually browse and launch your games.
How ES-DE Fits Into the Big Picture
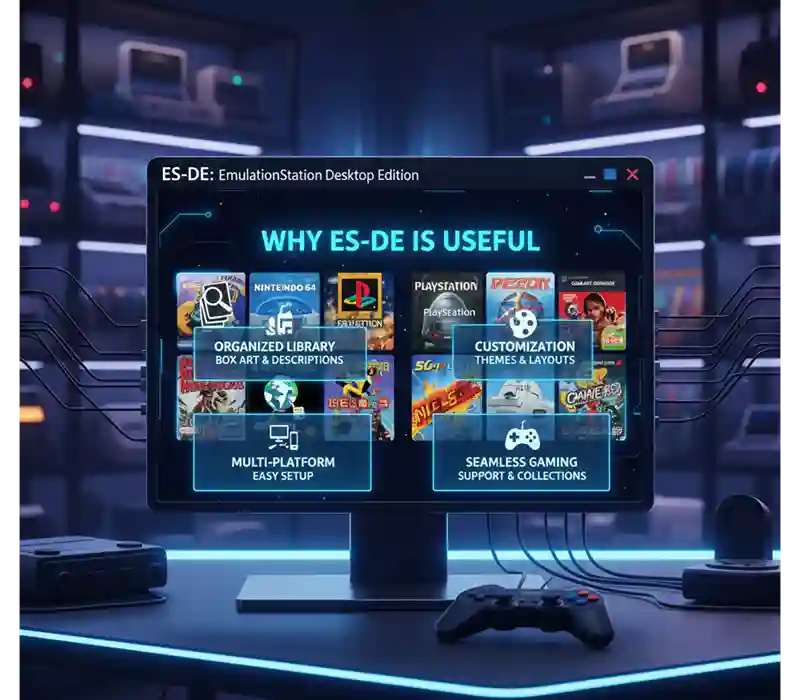
Why ES-DE is Useful
Without ES-DE, you’d need to launch each emulator individually, find your game files manually, and hope you remember where they’re stored. ES-DE removes that hassle by:
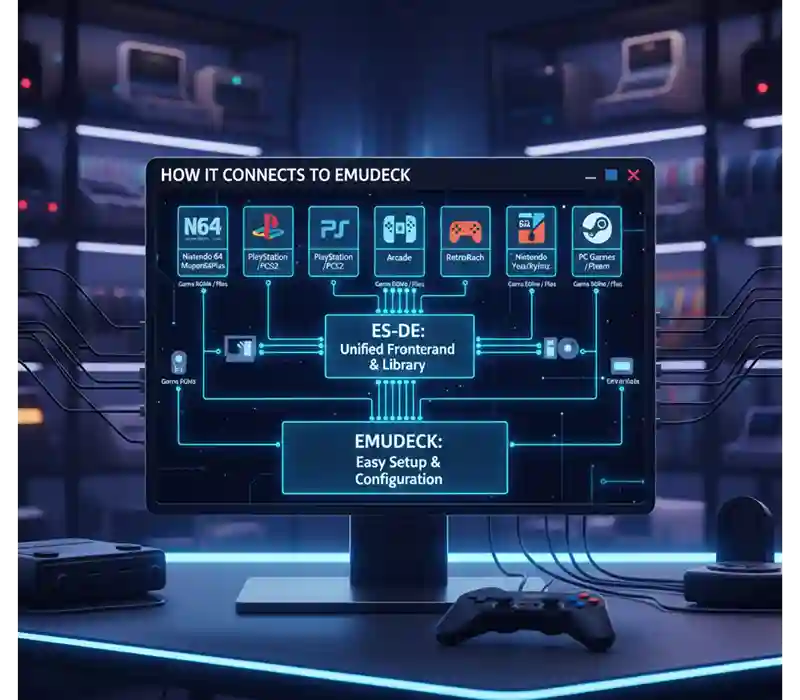
How It Connects to EmuDeck
Here’s the simple connection:
- When you install EmuDeck, it automatically sets up ES-DE for you.
- EmuDeck tells ES-DE where your games are and which emulator to use for each system.
- ES-DE is basically your “game launcher,” while EmuDeck is your “game setup manager.”
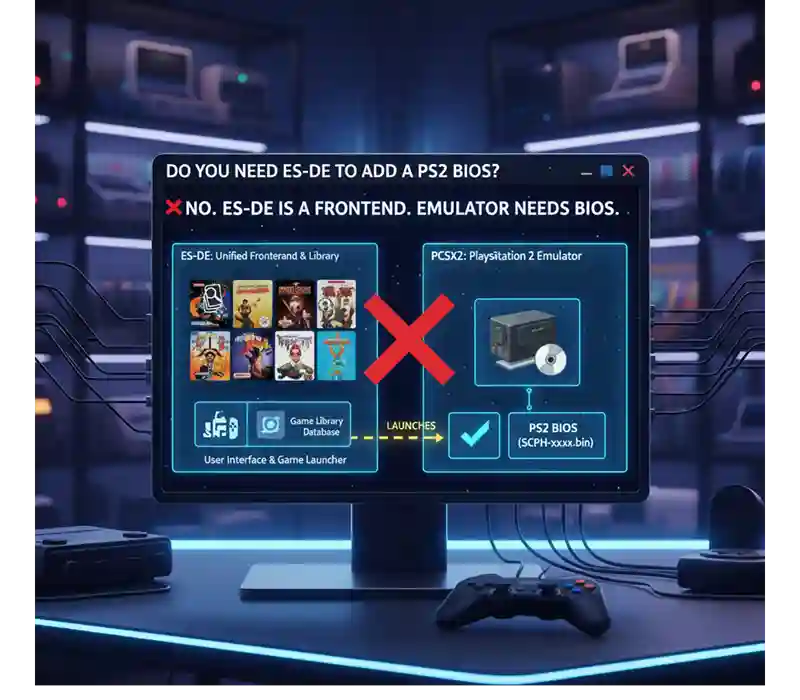
Do You Need ES-DE to Add a PS2 BIOS?
Nope — ES-DE has nothing to do with the BIOS process. The BIOS is handled entirely by the emulator (PCSX2) itself. Even if you never open ES-DE, you can still add your BIOS by putting it in the correct /bios folder.
However, once your BIOS is set up and your games are ready, ES-DE makes playing them much more enjoyable because you can:
💡 Pro tip: Even if you don’t think you need ES-DE at first, try using it for a week. The visual presentation and easy navigation might make it your favorite part of the EmuDeck setup.
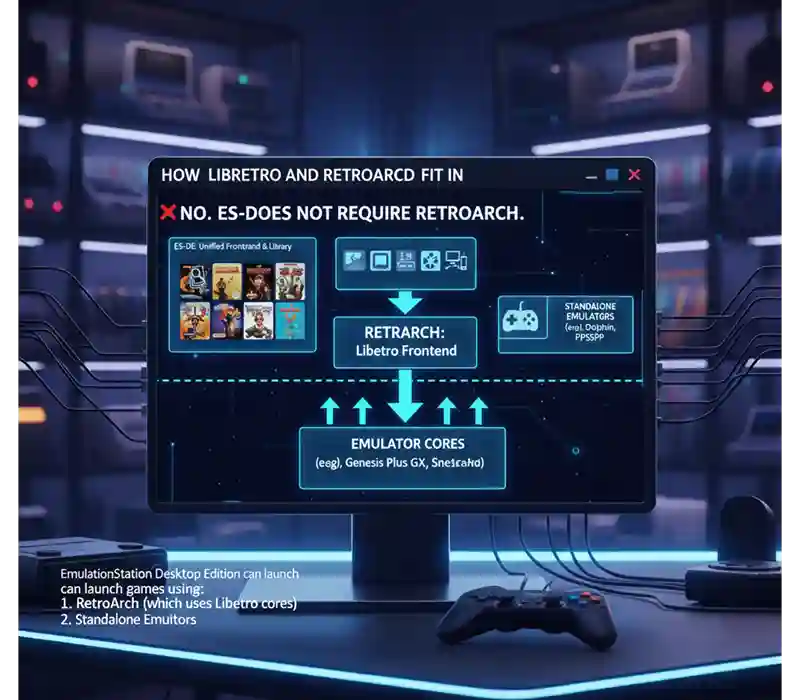
How Libretro and RetroArch Fit In
If you explore more about emulators, you’ll hear about Libretro — the tech behind RetroArch, a popular multi-system emulator.
The Libretro wiki has guides for adding BIOS files, setting up different systems, and tweaking performance. While PCSX2 is a standalone emulator (not a RetroArch core), the idea of “placing BIOS in the right folder” works the same way.
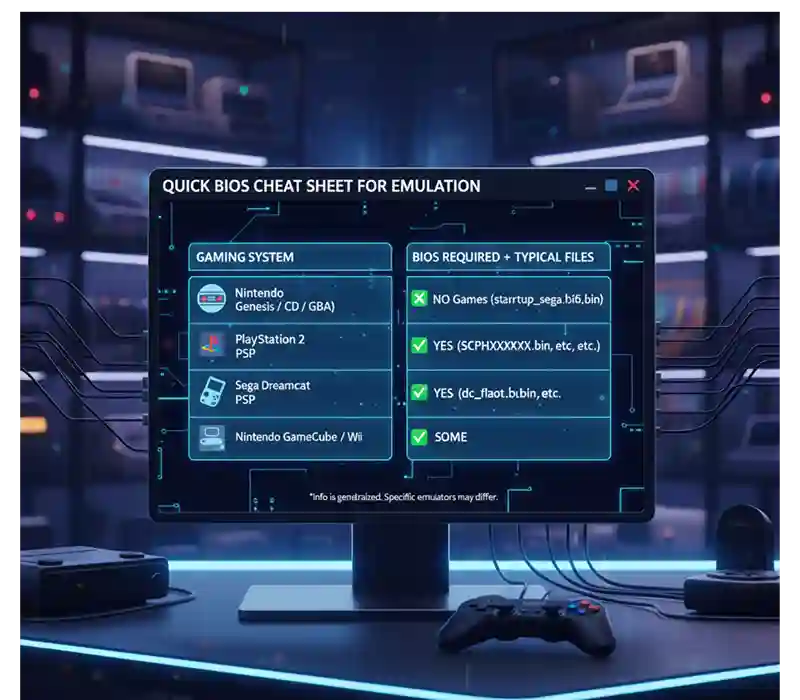
Quick BIOS Cheat Sheets for Other Systems
If you ever want to emulate more than just the PS2, here’s a quick comparison — just like adding the PS2 BIOS, other systems also require special files:
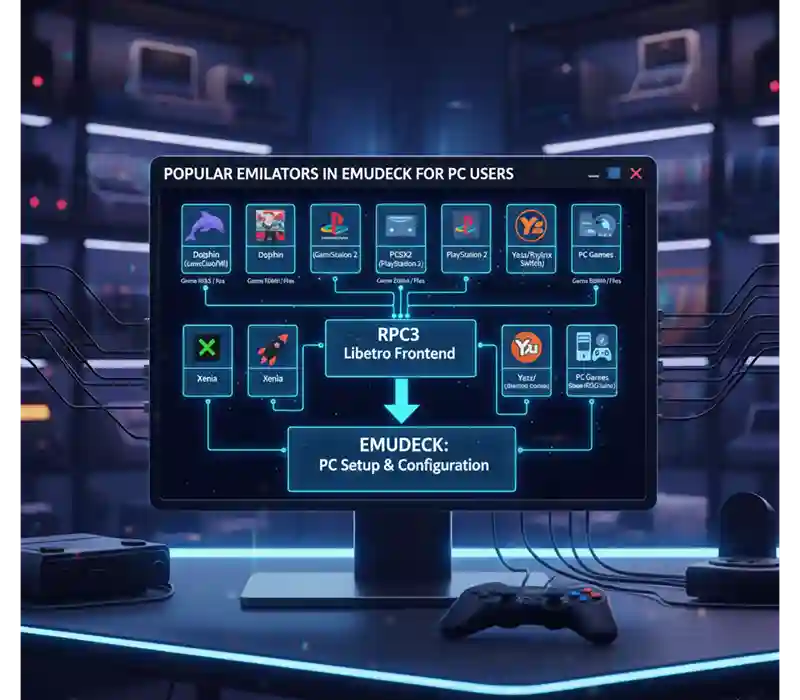
How a Popular Emulators in EmuDeck for PC Users Libretro and RetroArch Fit In
When using EmuDeck (or even just PC emulators), most players use:
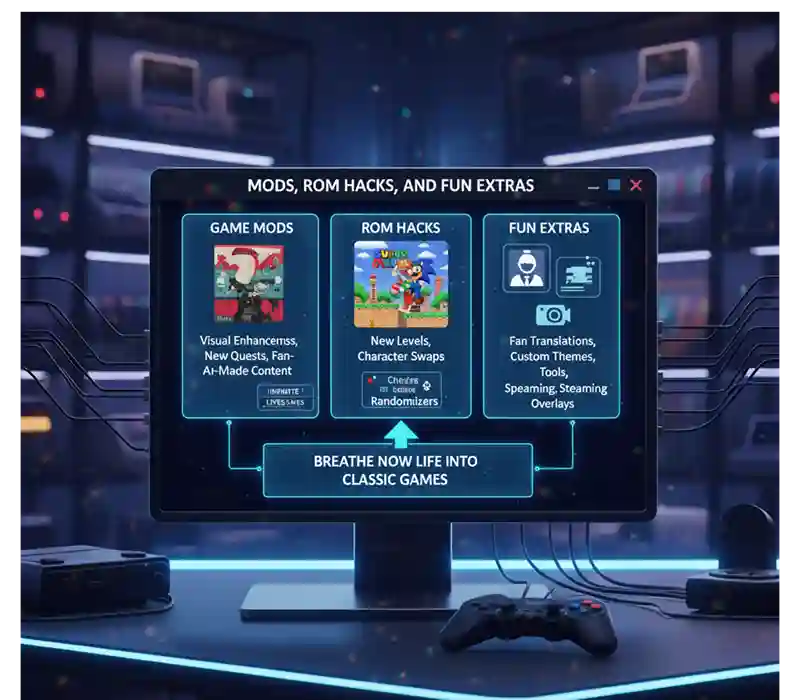
Mods, ROM Hacks, and Fun Extras
Once your BIOS is set up and your games run well, you can go further:
For example, you could create a Crash Twinsanity mod with new levels or textures, and play it right through PCSX2 in EmuDeck.
FAQs
Final Thoughts
Once your PS2 BIOS is in the right folder, EmuDeck transforms your Steam Deck into a portable PS2 console. From here, you can:
Just remember:
With your BIOS in place, the PS2 library is yours to explore — whether it’s epic adventures like God of War, chaotic fun like Crash Twinsanity, or hidden gems from the console’s golden years.